Tuesday 12 December 2017

Train Build Followup - Episode 198

At the end of October we had cut the train kit out and I passed it back to my Brother to paint, assemble and modify to make it run on a rail for his Christmas display.
This video shows the final result. 
The painting and assembly was easy but the real question is would it run on a track?

Click to watch

The plans used to make the train was purchased from www.makecnc.com

http://www.makecnc.com/steam-locomotive.php

The model was scaled up to use 12mm plywood and modified to run along the track puffing steam out the chimney. A light was added to the front of the train and the final touch of a steam train sound track playing from a speaked mounted on the train. Both day and might this train looks the business.


Tuesday 21 November 2017

Javi's Almost Impossible Challenge 2017- episode 187 - 197

Hi Everyone

Throughout the month of November I will be entering the Javi's challenge which will means one video a day all through November. These videos will be short due to the work load required to post them but hopefully you will find them entertaining. So join Chip and myself for the month of November.
This page will cover each day of video entries Starting at day 21 until day 30
I will add new videos to the page so bookmark it and check back each day.
Cheers
Peter

Where possible I will post links to the files I use however this will not be possible for projects.

Day 21 starts with a disaster and a Massage Roller which might come in useful later on.


Click to watch video

Files for this project courtesy of www.zenziwerken.de
Don't forget to check out the extensive range of CNC projects on his website.


Click to watch video

If you would lime to make your own Tablesaw Sled angle gauges here is the link to the files.
http://bit.ly/2zYqqf7


Click to watch video

Sorry no drawing available for this project.


Click to watch

Files for this project courtesy of www.zenziwerken.de
Don't forget to check out the extensive range of CNC projects on his website.


Click to watch

No file for this project as it is still a prototype. A new version will be created at a later date and files will be made available at that time for those interested.


Click to view

Trying out the filler I used to seal the MDF cupboard on a 3D model.
How well does it work?


Click to watch

A DIY Pizza Peel or Pizza Paddle if you prefer

If you would like to make your own you can find the files here. Please note that they are only available in VCarve Pro format as the fluted toolpath will not work in DXF format.
http://bit.ly/2AbBy8q


Click to view

This Boomerang file was created from a plan from the Kendall Davis website.
http://www.kendalldavis.us

The Ambidexter Boomerang plan. Use this shape your boomerang
Ambidexter.pdf

Only a VCarve file has been provided for this project as it uses a moulding toolpath that will not work in DXF format. The file was created using VCarve Pro 8.5 and will not open in earlier versions.
http://bit.ly/2Bkjpmb


Click to watch
While waiting for some varnish to dry I took a break and tested the Boomerang. A quick watch of a couple of youtube videos to see how to throw it and here is the result.


Click to watch
It's been a few years since I last did a PhotoVCarve. Looks like I still remember how.
I will make a new videoin the new year on how to use PhotoVcarve as it can be a bit of a blackart at times.


Click to watch

The final project of Javi's 30 Day almost impossible challenge. Thank you to all those who have taken the time to watched and commented on these videos. It has made it all the more enjoyable.
 Pushstick files:    http://bit.ly/2zAXKpw

Thanks once again.
Cheers 
Peter


Monday 13 November 2017

Javi's Almost Impossible Challenge 2017- episode 178 - 186

Hi Everyone

Throughout the month of November I will be entering the Javi's challenge which will means one video a day all through November. These videos will be short due to the work load required to post them but hopefully you will find them entertaining. So join Chip and myself for the month of November.
This page will cover each day of video entries Starting at day 12 until day20
I will add new videos to the page so bookmark it and check back each day.
Cheers
Peter

Where possible I will post links to the files I use however this will not be possible for projects.

Day 12 starts with a office cupboard build.
Fear not, there will be some CNC work involved in this project but directly and indirectly.


Click to view

Part 1 of the Office Cabinet Build


Click to view video

If you would like the files to make your own corner clamps please follow the link below.


Click to view Video

Part 2 of the Office Cabinet Build


Click to view

Sorry, No file available for this project.


Click link to view

Part 3 of Office Cabinet build
Link to Hinge drills http://ebay.to/2hqf6Sn


Click to view


The Bubble Trivet file is located here:  https://www.zenziwerken.de/Household-Items/Trivets
Don't forget to checkout his website.


Click to view video
Another necessary tool for the Office cabinet build. This time made from a cutoff it will allow accurate drilling of the shelf pin holes.


Click to watch video
Final part of the Office cupboard build adding the shelves.


Click to view

Files to make your own Push Stick can be found here.     http://bit.ly/2hPdgKS


Wednesday 1 November 2017

Javi's 30 Day Impossible Challenge 2017 - episode 166 - 177

Hi Everyone

Throughout the month of November I will be entering the Javi's challenge which will means one video a day all through November. These videos will be short due to the work load required to post them but hopefully you will find them entertaining. So join Chip and myself for the month of November.
This page will cover each day of video entries starting at day 1 and continuing to Day 11. I will add new videos to the page so bookmark it and check back each day.
Cheers
Peter

Where possible I will post links to the files I use however this will not be possible for projects.


Sorry no plan available or the angel project


Click to view video


I cannot provide the file used for this project but checkout the link below. It is a very similar puzzle and in some respects better. This is an excellent site for project ideas so check it out.


Click video to watch

There is no file for this project as it is custom made for a Dyco Saw which is a New Zealand made Tablesaw unlikely to be owned by any viewers. If you have a Dyco saw and would like the file please email me and I will be happy to share it.


Click to view video

This is a BigZ 3d puzzle posted by BigZ on the CNCZone. Mine was scaled to use 6mm MDF so remember to scale the model to suit your material.


Click video to view
 No File available for this project


Click Video to view
This video is not part of the Challenge but a Bonus into the workings of Chip.


Click to View

These pipe clamp feet can be downloaded from     Pipe Clamp feet


Click to watch

Files to make your own Cribbage board can be downoaded from here: 


Click to view

The fiile for this project is courteousy of www.zenziwerken.de
Be sure to checkout his site for excellent projects.


Click to view

Sometimes you just need to try something for yourself and see what works with you.
The filler used for this is Haydn Professional filler.


Haydn Professional Filler 4 litre is a single pack, quick drying, water based filler, suitable for interior and exterior application. It can be applied over timber, masonry, plaster and primed metal. It has minimal shrinkage and can be nailed, screwed or planed and is easily sanded.


Click to view video


Files to make your own No Junk Mail Sign can be found below
https://www.dropbox.com/sh/fue1qqj2ss2ugh0/AABeYhPj_u1taJ02fEUOeoF_a?


Click to View

Files to make your own Pebble Smart watch stand available using the link below.
https://www.dropbox.com/sh/20s8zfrd4vvzxl0/AACCvEDt_rtGoJs5HhwA6XS_a?


Sunday 22 October 2017

How I Machine Without Holding Tabs - episode 165

There are times when I find it desirable to machine a piece without using holding tabs to keep all the parts in place. I started doing this 5 years ago and over time have refined the technique and defined the rules that I observe when doing this. 


Click to view this video.

The Rules!
  • You must use a 1/8 or 3mm down cutting spiral router bit.
  • Do not use this techniue on material thinner than 1/2" or 12mm.
  • Use only on wood.
  • If available use a dust shoe. If you find that the vacuum is pulling too much chipout of the slots then turn the vacuum off but leave the dust shoe in place.
  • Do not do this on anything you cannot afford to remake should it suffer damage.
  • If things are not cutting as expected then stop and sort it out before continuing.
  • This is not a standard machining technique so use at your own risk.

I have found that following these simple rules have worked well for me over the years.


Where did I get the cutters for this project?
The cutter I used were purchased from this supplier on Ebay
http://ebay.to/2xienoR


Other ebay suppliers of 1/8" down cutting bits.
http://ebay.to/2zfwxYY


They are 1/8" in diameter single flute down cutting spiral bits.
The length of the cutting edger is 10mm ( 3/8") but anything similar eg 12mm(1/2") cutting edge would work just as well. There is little point having a longer cutting edge unless you are looking to cut your material in one pass. The flute area is weaker than the main shaft so a longer flute just weakens the cutter in my opinion. In fact since I do not cut more than 1/8th per pass any flute longer than 1/4" is a waste.

Cheers
Peter

Monday 16 October 2017

Building a model Train Part 2 - episode 164

This week I continue on with last weeks project of cutting model train parts for my brothers Christmas display train. Just under 1 sheet of Plywood to finish it off and i am looking forward to completing the project.
I will also how how I made the files that allowed me to machine a piece of stock longer than my Table top by rotating the stock 180 degrees.


Click to watch Video

Where did I get the cutters for this project?
The cutter I used were purchased from this supplier on Ebay
http://ebay.to/2xienoR


Other ebay suppliers of 1/8" down cutting bits.
http://ebay.to/2zfwxYY


They are 1/8" in diameter single flute down cutting spiral bits.
The length of the cutting edger is 10mm ( 3/8") but anything similar eg 12mm(1/2") cutting edge would work just as well. There is little point having a longer cutting edge unless you are looking to cut your material in one pass. The flute area is weaker than the main shaft so a longer flute just weakens the cutter in my opinion. In fact since I do not cut more than 1/8th per pass any flute longer than 1/4" is a waste.
 
How much Plywood So how much 1/2" plywood was used to make this project?


How easy did it go together?
It went together a dream. I really thought I was going to have to fight it and round all the corners on my parts to make them fit. Much to my surprise it didn't require it. It makes me feel happier about attempting another project in the future.

More photos of the train


How big was the train?

66" long  (5' 6")
11" wide
25" high

Not sure there is much more to be said except thanks for watching and I'll see you next time.

Cheers
Peter


Wednesday 11 October 2017

Building a model Train Part 1 - episode 163

At the start of this year my brother came to me with a thought that a train would make a good addition to the Christmas display he has on his front lawn. With Christmas fast approaching he hunted out a model that we could cut on the CNC and this episode is the start of the train build process. This train is going to be large when it is finally complete and if all goes well it will be motorised so that it can run on a track. The first step in a project like this is to get the train itself built so in this episode we start cutting out the model and get parts of it assembled.


 Click to watch video


Scaling the model (Box Method)

Scaling the model is a necessary part of making this model and i like to make things as simple as possible. That means not having to hunt around for a calculator to work out how much to upscale the model by. To make things easy I developed the Box Method of scaling which in my opinion the easiest way of scaling a drawing accurately snce you don't need to calculate anything.
There are just 3 simple rules to the scaling method.
  1. The box must be larger that the item being scaled.
  2. The box must enclose the entire item being scaled
  3. One side of the boxes dimension must bear a direct relationship to the measurement being scaled. eg for a 3.4mm item I wanted to scale to 5mm I would make one side of  the box 3.4 metres long.
Select the new box and everything inside it.
Scale the dimensioned side of the box to the new dimension eg. If I wanted my 3.4mm piece to become 5mm the I would scale my 3.4 metre to 5 metres and the drawing will be automatically scaled to the correct size all without having to work out the scale factor.
Give it a try and see what you think.

In the next episode I will be showing how I layout the parts for cutting and how to use the 180 degree method to cut the remaining parts on the end of the stock.

Untill next time thanks fortaking the time to watch and read.

Cheers
Peter

Where did I get the cutters for this project?
The cutter I used were purchased from this supplier on Ebay
http://ebay.to/2xienoR


Other ebay suppliers of 1/8" down cutting bits.
http://ebay.to/2zfwxYY


They are 1/8" in diameter single flute down cutting spiral bits.
The length of the cutting edger is 10mm ( 3/8") but anything similar eg 12mm(1/2") or 6mm(1/4") cutting edge would work just as well. There is little point having a longer cutting edge unless you are looking to cut your material in one pass. The flute area is weaker than the main shaft so a longer flute just weakens the cutter in my opinion. In fact since I do not cut more than 1/8th per pass any flute longer than 1/4" is a waste.


Model used in this project
www.makecnc.com/steam-locomotive.php 
website:
www.makecnc.com

Sunday 24 September 2017

DIY Ebike Part 3 - episode 162

Welcome back to the third and final part of the Ebike build.
This episiode I make the battery box and get everything connected.
the box proved to quite challanging despite being such a simple thing. Mostly because to the lack of mounting points up the side and the triangular shape of the cavity. Depending on how your bike is constructed it could be a very easy task indeed.

Click to watch video


Moulding toolpaths
The bottom peice is made using moulding toolpaths which is a great way of creating complex mouldings in a very simple manner. So long as you create an accurate shape for the job and and orientate the mould correctly you will get exactly what you are looking for.
Vectric did an excellent job in adding this feature. You need VCarve Pro 8.5 or later. Is is also a feature in Aspire. 

Is it finished
In the future, but not yet, I will be moving the motor to under the bottom bracket and converting it to  a mid drive to see what the difference is. Something for another day. I will have a play with it as it is in the mean time and see how it goes for me. 

Last Thoughts
I hope you have enjoyed this little project series and maybe you will look at converting your own bike. There are many different kits available all with their advantages and disadvantages. Mine is the cheapest and by no means the best or prettiest option. It does however offer different options for mounting and allows someone without much spare cash to get their feet wet and see if they like it.

Until next time 
Cheers
Peter

If you haven't already seen the initial run of the bike then here is the video that shows how it goes and my thoughts as we go.

Click to view the video


Monday 4 September 2017

DIY Ebike Part 2- episode 160 & 161

In this episode I install the kit parts onto the bike.
A relatively simple job if everything can fit where you want them too but if like me you have integrated parts that foul on the new components and need to get replacementparts so that it can all fit together. Fortunately my brother is CycleNutz and has a selection of parts you to rebuild a bike on hand.

 The install process is straight forward and once you make the hard decisions you will have it done in no time.

 Click to view Video


 Bonus Video

 While this was meant to be the last video in the series I have moved it forward so that if anyone is thinking of following in my footsteps they will have a better idea of what to expect from the kit I purchased. A quick ride around the block with a few thoughts as I go.


Click to watch video


Final thoughts

I went this route with my build for several reasons. 
First was cost as I didn't have much to spend on this build.
Second I wanted to investigate both rear and mid drive options. A hub drive won't allow this.
The postage on a hub or mid drive kit alone is the same price as this entire kit delivered to my door and this kit will give me a taste.

If I had the money I would go for something like this as mid drive seems to be one of the better options for bike conversons and this kit looks to be very popular.
Ebike Kit

Please note that by using the link provided  I receive a small commission on any purchase you make, at no extra cost to you. If you do use the link then thank you for supporting my channel but please do not feel obligated in anyway.Get the best deal for you from a supplier of your choice.


Next episode I will be finishing the batery box and will show how I machine some material to fit around the bottom rail of the bike without having to use 3d modeling.

I hope you enjoy
Cheers
Peter


Wednesday 30 August 2017

DIY Ebike Part 1 - episode 159

A change of pace this episode. For many years i wanted to build an electric vehicle. Several things stopped me at the time, the biggest of these being money. I really wanted to build an electric car but the best I could hope for was an electric bicycle. I made a couple of attempts when I was younger but never quite managed to do it.
Fast forward to an interview with Bill Griggs of CNC Router Tip Podcast a few months ago and a question he asked about what I would like to do if I could. Eventually I remembered the Electric vehicle I never managed to build.
Check out the interview here 

Yes Bill this is all your fault. :-)

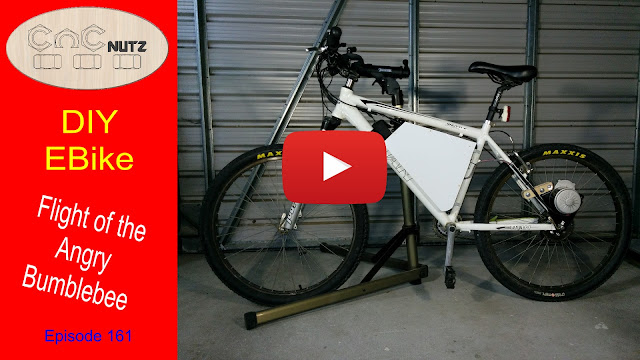
My budget for the build is very small but I already have some batteries and after searching around I found some kit options. I could have bought an electric hub but that isn't my style, (or lack of).
I also want to explore the option of rear wheel vs Mid drive and an electric hub won't work for this. It seems that Mid drive is the way of the future so once I have it running in this configuration I will look to changing to Mid drive and see what the difference is.


Click to watch video

The Kit
I ended up buying a 250w kit because 300w is the maximum allowed for an electric bike in New Zealand. The kit is very cheap compared to others drive systems available and made it worth tasking the risk.
Electric bike kit I used

This video is the unboxing of the kit and showing what comes with it. I was quite surprised with some of the little extras that came with it which was very welcome and made the install easier. 

I hope you find it interesting despite that there is no CNC in this video but I wanted to share the build process. There will be a little CNC in this project and will be using a new toolpath technique I haven't tried before so that will be something to look forward to.

Will it work?
Join me for the next thrilling installment.

Cheers
Peter

Tuesday 22 August 2017

Recover X&Y using Magic Offsets - episode 158

After my last video it was noted that I had left out 1 option to recover from a power outage and recover my X,Y,Z original positon. I had not covered this option for a couple of reasons. 
What was the method?
Using the offset between Machine coordinates and Working coordinates you can recover your position. It has long been used by machinists who have homing switches on their machines to restart the next day and take up from where they left off. Brilliant! I hear you say, but this method has always had a fatal flaw and to the best of my knowledge no cure. The offset is not saved unless the PC is shutdown correctly. If the power goes off in mid cut the offset values are lost. 
Jerry Rutherford from "askjerry"  Youtube channel, did a video response to my last video and explained the offset priciple and how it can recover position if the machine is shut down correctly.
He also showed that if it is not shutdown properly how this position is lost. Jerry is using LinuxCNC but the principle of operation is the same.

I did a bit more research into offsets to find a method to save them and much to my surprise there is a very simple way to do this, right under my nose. I gave it some testing and found that it works very well in both UCCNC and Mach3
I don't know if this is not well known but I haven't heard anyone mention this feature and given how with the push of a button you could save your work from ruin I'm surprised I haven't come across it before.

Click to watch Video

 Homing switches

This method really suits those who have homing switches installed on their machines. Combine automatic homing with the Offset save feature and you can have a fast accurate method to reset your cutter back to your work.

Accuracy
 The accuracy of such a setup is only as good as the accuracy of the homing switches. If you cannot get repeatible results then you need to look at your homing switch setup.

Manual Homing

While the video demonstrates that it works and works well in reality it will probably only get used in large jobs simply because of basic human nature. 

My personal opinion

In the past expressed the opinion that limit and homing switches are not "needed".
I stand by that opinion however, this is the first time I have seen a feature that adding these switches to my machine would give me that I consider worth having.
While I will not be rushing out to install them at this time I will think about adding them at a later date.
Please do not think that I am anti limit switch because I'm not. Up until now I haven't seen anything that they will do for me that interests. That isn't to say that I wouldn't use that if I had them. Most likely I would probably enjoy having them but there is a difference between Need and Want.

askjerry
Thanks Jerry for making this video and testing other options.

Here is Jerrys video explaining how the offsets work and he demonstrates how to do it using a leadscrew machine. His Frankenlab series is well worth watching and don't forget to check out the Awesome laser he has for his machine. 

 Jerrys YouTube Channel


Check out his video below.


Click to Watch Video


Final thought
I don't know if there is an option to do this or not but i would like to see offsets automatically saved everytime your X,Y or Z working coordinate is changed with the zero button. This will then ensure that a recovery is always an option if you have homing switches installed. Maybe a macro will do this, but I will have to leave this to people much smarter than myself. 


Thank you for taking the time to read this and I will catch you next time.

Cheers
Peter


Wednesday 9 August 2017

How to find XYZ - episode 157

Loosing position while machining a project can happen for a variety of reasons. sometimes the work is damaged beyond repair and sometimes all you need to do is reset your cutter back to the origin point and resume cutting. While the destruction of a piece of work is a blow that we will all eventually suffer the 2nd senario can be the more frustrating. a perfectly recoverable piece of work if only there was a way to find the origin point and continue from where it left off. 
This video highlights 4 ways of resetting a cutter to the table if you loose position. The difficulty of the recovery process will depend on whether you take the extra minute and plan ahead when you create your files or you decide it will never happen to you and take the chance.

Click to watch video


Accuracy 
Ultimately accuracy of the reset cutter will depend on what method you use to reset and if you are doing it manually how much time you invest in getting it right. When it comes to ease, speed and accuracy you can't go past using electronic methods such as the tripple edge finder. The next best option is the hole method demonstrated in the video. After that it gets much harder and accuracy will vary. I found the slot method or setting the cutter particulary frustrating because I filled in the X coordinates into the Y DRO in my controller software and had to restart. It is not dificult but if you aren't paying attention you can easily make a mistake.

Homing switches
Since I do not have homing switches on my machines and have never used a machine with limit switches I cannot comment on if they are useful for resetting or not. If someone can point to a video demonstration of the recovery process then I will update this page and put a link to the video for those interested.

Restarting
This video is a follow on from my previous video on the subject of stopping and restarting Mach3

Stop and restart Mach3 - CNCnutz Episode 119

 At the time of making this video I did not have UCCNC but both softwares are very similar in operation. If you are using an automated spindle make sure you have the Estop switch at hand in case the spindle does not start turning when it restarts the cut. In hindsight and on both controller softwares I would manually start the spindle just to be on the safe side. Personally I am still getting used to an automatic spindle and I can honestly say I am still can't get used to it. I do like the auto stop feature though.

Tripple Edge finder
This product designed and  made in the USA by Bill Griggs is a versitile piece of kit.
It probably has far more uses than most people realize and if you are looking for a product to reset your X,Y & Z position you would be hard pressed to find anything better.
Check it out  www.themakersguide.com


 If you are interested in this product check out his website and the various tutorial videos he has on installing it into Mach3 and using it.

The 2017 Screenset for UCNCN from www.thecncwoodworker.com   has built in centre finding and auto Zero that should work well with this product. I do intend to test this out myself in the near future.


2017 Screenset Probing video

If anyone has additional information regarding the Triple edge finder and UCCNC please let me know and I will update this.

As usual your thoughts and comments are always welcome.
Thank you for taking the time to read this and until next time.

Cheers
Peter

Saturday 29 July 2017

Keyholes - episode 156

It's time to have a peek into keyholes.
They are very useful when it comes to a method of hanging projects on the wall but there are more useful than that. The slots we use for out holddowns on the CNC table are nothing more that Keyhole slots that run the entire length of the table. Used properly these slots can work well but ther do not have the strength of and Aluminum Extrusion but on a small machine they could work OK. I used a Keyhole cutter to cut slots in my router table for fence adjustments and they work very well.

Back to Keyholes for mounting projects to walls.
Not many CAM software packages can create the required toolpaths but VCarve Pro and Aspire can by the use of Gadgets. There is a gadget for Keyholes and it created the necessary toolpaths for cut them. Keyhole toolpaths are different in that the require the cutter to plunge the full depth into the material and them move along cutting a slot under the surface. A small slot is cut by the shank of the cutter. It then needs to reverse back to the original entry point and exit using the hole.

 Click to View video

Cutters


Keyhole cutters come in varing sizes and designs but the most common is the basic L or T shaped cutter but this by no means the only shapes they come in.


They all have a couple of things in  common. A large blade at the bottom and narrower blades above it to allow it to undercut the surface. In normal theses cutters are put under a lot of stress because they cannot clear the cut material so take it slowly.
While the Bottom blade seem to come in standard 3/8" and 1/2" the upper blades seem to come in several sizes. 
3/8" Lower with 3/16" upper or 1/4" upper
1/2" Lower with 5/16" upper or 1/4" upper
There are also metric versions of these cutters of very similar size so choose carefully what you buy. As with all cutters the price varies considerably froma couple of dollars to $50 or more. Given how often you are likey to use a keyhole cutter I would tend to get the cheaper one ans wouild probably be lucky to blunt it and remember those cutters can be sharpened easily.
The one thing you must watch out for is the maximum depth of cut which is determined by the overall length of the cuttinb blade. This will be the large and small bales combined height. Do not exceed this or you will break the cutter.


I have created some Gcode to use for the cutting of keyholes to hang projects on the wall. Please read the READ ME fole included in the zip files below to make sure you understand the requirements and the risk of using unknown Gcode.

Imperial Keyhole 29-07-2017.zip


Metric Keyhole 29-07-2017.zip


 Where to purchase cutters

These types of cutters are available from many suppliers so pick the supplier that works best for you.

Please note that by using the link provided to visit the Ebay site I receive a small commission on any purchase you make at no extra cost to you. The link will provide you with search results for Keyhole cutters so shop around and find the best deal for you. If you do use the link then thank you for supporting my channel and remember it costs you nothing.


 Keyhole Cutters


Many thanks for visiting and I will catch you on the next one.

Cheers
Peter