Friday 26 May 2017

Making an Aztec Calendar Part 1 - Episode 149

Part 1
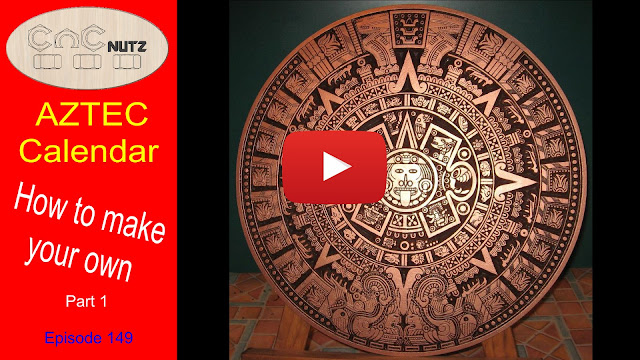
It almost seems a right of passage to make an Aztec Calendar and despite the rumor that the world would end back in 2012 when the calendar ran out, the desire to make one hasn't.
How you read and use the calendar is a complete mystery to me and I suspect everyone who has ever made one other than the creater of the original. 
We don't need a fancy Calendar in this day and age to tell us when to plant and harvert our crops, make sacrifices to our various gods and how much longer it is until Christmas as we now have our smart phones to tells us all this and more. But you have to admit, it is cool to have an Aztec calendar on the wall.
This particular one is almost 2 foot in diameter (600mm).


I'm breaking this build down into several parts outlining each step of the process.
This will make it easier to follow for those who want to  make their own

https://youtu.be/VRPEexGljq4


Cutter Angle!

One of the main things you need to get right when VCarving is cutter angle.
If the andle specified for the Vbit is not correct your Vcarving won't look right and it only takes a small deviation in angle to make a noticible difference. To this end it is important to test the actual angle of any new cutter you get as opposed to believing what the manufacturer says it is. Spending a few minutes here will save you many hours of wasted time and material. You only need to do this once so it is well worth doing just to be sure.

 To see how to Test your cutters please click on the link below.
This will take you the a video explaining in detail the process and you can download files for cutter 90, 60 and 45 degrees in various formats. 


http://www.cncnutz.com/2017/06/test-your-v-bit-angle-episode-151.html

If you are looking for the Calendar files please click on the links below


https://www.dropbox.com/s/fiagixj5e3zf02k/Aztec%20calender.crv?dl=0

Aztec Calendar file in Vcarve Format

Aztec Calendar file in DXF format


In the next episode I will show how to paint the calendar.
I hope you enjoy and until next time.
Cheers
Peter


Saturday 13 May 2017

Mach3 and UCCNC spindle control with RS485 - Episodes 147 & 148

2 videos this week  covering how to install an RS485 adapter to your PC and tehn control your spindle. I split it into 2 seperate videos so that viewers can watch the relevant version without the distraction of irrelevant information relating to another control system. It should make viewing easier.
Whether you are intersted in Mach3 or UCCNC just watch the appropiate video for your control software. Even if you don't run these control systems watching will give an insight into what RS485 is and how it is used.


MACH3 - episode 147


The plugin used is available from this website.
http://royaumedeole.fr/informatique/plugin-mach3-pour-vfdhuanyang/mach3-plugin-for-huanyang-vfd/

It has most of the information required to make the plug in work but please watch the video to the end as there is an extra step I did to make the plugin work which is not mentioned in the documentation. Without it the plugin won't work.

This is quite an old plugin and it should be very stable.


 Click to play Video


 UCCNC - episode 148

 The plugin for UCCNC has been under development for a little while but the latest version was released only a few days ago. A big thank you to Dan911 for all the hard work he has put into developing this plugin and also the help he gave me in tracking down a problem with the adapter I had. (more on that below)
The development thread for the plugin can be seen here.
http://www.cnczone.com/forums/uccnc-control-software/321354-huanyang-vfd-macro-plugin.html

The actual plugin I used in this video, HY10, is located here
http://www.cnczone.com/forums/uccnc-control-software/321354-huanyang-vfd-macro-plugin-7.html#post2043538 

Subscribe to the development thread for new plugin versions as they are released.

Current UCCNC Plugin


The plugin file contains a text document giving instruction on changes you needed to make to the VFD configuration as well as UCCNC.

 Click to play video


Wiring Diagram

The wiring for this couldn't be simpler
It requires only 2 wires and these need to be a twisted pair. Feel free to use a screened cable but make sure there are 2 wires in the cable and use them for communication. Ground the shield at the VFD end only and do not connect the other end of the shield.

Click to enlargen


VFD Programming

For both Mach3 and UCCNC the VFD programming was the same.
Here are the settings I changed. It is not complete programming for the VFD but simply the changes needed to bring it under RS485 control. It assumes an already working spindle

PD001          2           Enable RS485
PD002          2           Enable RS485
PD004          400       Spindle frequency from spindle name plate
PD023          1           Disable reverse rotation of spindle
PD163          1           VFD Address
PD164          1           Baudrate 9600
PD165          3           8bit, No parity, 1 Stopbit,  RTU


RS485 adapters

I had a bit of trouble with the first adapter I purchased with it failing to change the speed of the VFD intermittently and seemed to run slow on startup with the UCCNC plugin.

When i got the new one I opened up both RS485 adapters and I noticed 2 things about the first adapter I have purchased.
1st the metal case of the USB plug was not soldered to the circuit board. Not a problem as far as the operation of the adapter goes but mechanically it will cause premature failure of the device as it puts strain on the USB connectors pins. It also gives a clue as to the quality of the build.
2nd I noticed that the USB to serial IC is unlabeled and it is not because the name has been scratched off as is sometimes done to hide a critical IC's identity.
I suspect it is a copy of the Prolific 2303 chip and was not working correctly with the drivers.
The utility on the prolific website identified it as a PL 2303 series chip so maybe it is genuine but I find it hard to believe they wouldn't put their name on it. This IC is also a well known target of counterfiet though the Prolific drivers aren't meant to work with it at all.

The FDTI chipset maker is also a target for chipset copying and thier latest drivers won't work with a counterfiet chipset.


The Prolific Adapter


The CH340 adapter is a better build quality and the USB to serial IC is labelled


Both use the Max485 line driver IC for output to the VFD which converts RS232 to RS485.


I don't know if the adapter is counterfiet,faulty or something else but it may be safer to use an adapter with a CH340 chipset as these don't seem to be copied by anyone and so the drivers should work with the plugins. The prolific and Ch340 adapters look the same and cost the same so its a toss up which one to get. The Le royaume d'éole plugin documentation uses the prolific version of the adapter so either should work ok.

   Download Adapter Drivers

If you are looking for an adapter try the link below. By purchasing a product using the link provided, you help support my channel. The link will take you to search results for the RS485 adapters and you can select the type you want to use.


 You are not restricted to the type or style of adapter shown here but if you are in anyway unsure of what to buy then get one that the same as shown it the video. at about $2 to $3 delivered you can't go far wrong though it is an inconvenience having to wait for it to be delivered. 


Tuesday 2 May 2017

Installing a Spindle Part 3 - Episode 146

Control the Spindle from Mach3 or UCCNC

This video will show how I wire a relay to the Gecko G540 to turn the spindle on and off and then follows up how to program both Mach3 and UCCNC to control the relay.
Once that is done I show how with just 3 wires you can add speed control from both Mach3 and UCCNC.
All the required documentation you need is available for download on this page and they are quite comprehensive. I will not repeat thier contents here.


https://youtu.be/Xd3K47Iuwv8


Complete Wiring diagram for my Machine


 The documentatiion you need to set up both Mach3 and UCNCN are in the 2 files below. Download and follow the instructions and you should have a working system.

Setting up Mach3 Relay and speed Control
Download File

Setting up UCCNC Relay and speed Control
Download File


Please note that the speed will vary from the requested one as there is no feedback from the spindle for UCCNC to verify the actual speed. It should be within a couple of hundred Revs of the required speed. Changing the PWMBase Freq can make a large change to the final RPM but I found 1200 gave acceptable results on my setup. Do not expect perfect speed.

Any comments or questions please feel free to contact me either using the comments section here or on YouTube. Feel free to email me if you wish.

Hope this helps

Cheers
Peter