Monday 30 April 2018

DIY Vacuum Table Part 2 - episode 211

Following on from the last episode I have made changes to the Vacuum table to get the project back on track. Many thanks to those who provided feedback and suggestions on possible fixes to the problems I faced. In the end I opted for the simplest solution of painting the MDF base and the edges. This sealed the table very nicely and because most of the vacuum was being lost throught the bottom of the table I added a vinyl sheet puchased from a local craft shop for a couple of dollars. It is very effective and enures the perfect seal on the bottom. Once this was done the vacuum was restored along with its holding power. The solution I used was only one of several suggested by viewers all of which would have worked
Suggestions
Use a non porus material for the base like Plastic sign board or HDPE
Use Malamine coated MDF and seal the edges with edge banding.
Seal the MDF with paint, shellac or similar product. 
Leave the vacuum running while painting to pull the paint deeper into the MDF to get a better seal.
Cover the MDF with a vinyl or similar coating.

Here's the final result.

Click to watch


Getting a better seal
Even with the table sealed and maintaining the vacuum the issue of sealing the material to the tabletop remains. With the table flat there are still small paths for the vacuum to escape due to material imperfections. What is needed is come form of gasket to get the good seal and many solutions use Orings. these won't work if you want to cut through the material as I do and making special vacuum bases per project isn't practical.
I remember Micheal, who visited me about 18 months ago, telling me he used some form of material between his vacuum table top and the stock to get a better seal. I can't remember what it was but I had an idea to put a piece of newspaper on the table surface and see how that went. To my surprise and great pleasure it makes a huge difference to the holding power of the vacuum. It will reduse the air flow through the unused holes while alloing the vacuum to build up under the stock. I will also provides a little clearance between the tabletop and the bottom of the stock so when cutting through the cutter won't touch the table surface all going well.
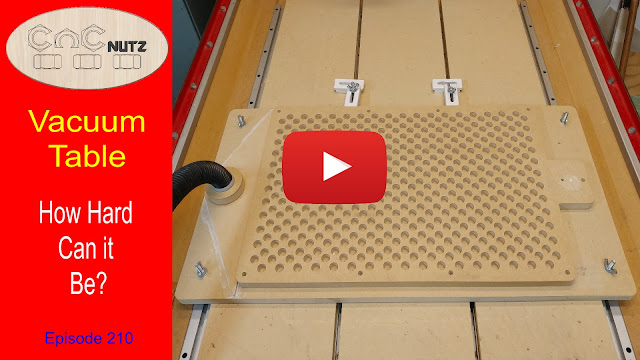
Small Holes
The use of the small holes in each pod looks to be just ideal. The vacuum pulls very quickly but even with most of the pods uncovered or covered with paper the vacuum seems to have good holding power. Had I put 1/4" holes in in each pod the uncovering of just 1 or 2 of them would have meant loss of vacuum on the entire table. It also eliminates the need for sectioning off areas of the tabletop though if I had made it larger it mag have been necessary.

Vaccum source
This is the hardest problem to solve and something you need to be aware of.
Vacuum cleaners are not made to but used with vacuum tables. While they obviously work and are used by many people the restricton of the hose robs the cleaner of the necessary cooling air it needs to keep the motor cool. If you don't cool the motor it WILL burn out. The vacuum I used in part 2 of this video is made by Festool but has been superceeded. It has seperate cooling for the motor so is a good option for this project. 


 The motor cooling outlet can bee seen as the grill on the front of the cleaner and the exhaust for the vacuum is visible on the left hand side of the cleaner. when you block the hose the exhause on the left stops but the one at the front keeps blowing. the only down side of these is the cost but it is a professional unit made to collect fine sanding dust etc. At over $1000 for one of these I think I will borrow my brothers on the occassions I need it.
Other options are real vacuum pumps though I dont know what size pump is really needed for this application. Ebay has some cheep ones at less than $100 USD but whether it will work with a midsize table top I don't know.
The other suggestion was to convert an air compressor to pull a vacuum. After all while it blows at one end it has to suck at the other. I'm told it can be done quite simply and not loose the compressor function. 
I actually have a 2 stage vacuum pump that I used to use as a compressor but its piston seals are damaged and it will not pull a vacuum any more. If I can find a suitable material I may be able to repair it but in the meantime the current setup will work just fine.

Please be aware of ordinary vacuum cleaner limitations.

Well that is all for this project. I am looking forward to using it on an upcoming video so until next time

Cheers
Peter

Monday 16 April 2018

DIY Vacuum Table - episode 210

I finally have gotten around to making a vacuum table for my machine. I was planning to make one the fill size of my tabletop but decided it was a bit ambitious for a first attempt. How right I was.
The idea for this build was built on one simple idea. Large holes for the pods fed by tiny holes such that even if many of the holes are uncovered the vacuum cleaner that I plan to use fore this projecj will still be able to keep the vacuum up to the rest of the pods. This is the mistake made in many designs that I have seen. They use large holes which as soon as they are uncovered, the vacuum source can't keep up with the air pooring in through the holes and the rest of the pods loose their vacuum as well.
By keeping the holes small the effect of uncovering these holes is minimal and the rest of the pods should keep their vacuum. The price to pay for this it the increased time to pull a vacuum on the individual pods but this is very minimal.

So what went wrong?

Click to watch

MDF is a porus material 
You don't need me to tell you this. If you have ever tried to paint it you will know it acts like a sponge and soakes up the paint like a thirsty man in a desert. I therfore thought it might loose a bit of air through the sides and I might need to seal the edges. I did keep plenty of material between the channels and the edges to reduce this but I wasn't prepared for the results. I had thought the compressed surfaces would be immuned to the air being pulled through them but how wrong I was. Inital testing early on in the buikld showed the MDF held the vacuum of but as time went on the MDF became more porus to the point where it doesn't really load the vacuum when the entire surface is covered. 

Where too from here?
 I have already come up with a simple way of fixing it and will be giving that a try next.
It has also given me a crazy idea on how to make the workds somplest vacuum table which I will give a go as well.

Until next time.
Cheers
Peter


Wednesday 4 April 2018

Joining Stuborn vectors in VCarve and Aspire - episode 209

This video is inspired by a subscriber who was having trouble closing the vectors on a project he was making. This video will show the issue and solution to the problem. Hopefully you will find it useful if you have a vector that stubbornly refuses to behave.

The problem is a lot more common that you might think and if not closed correctly can cause more problems than it solves. Simply increasing the tolerance of the join feature can sometimes be the worse thing you can do. Vectric software offers many tools that make drawing easier and there is more than one way to achieve the same thing. the trick is finding what is right for you and what gives the result you are looking for.


 Click to watch


Software used in this Demonstration
For this demo I used Aspire V9 from Vectric. I have been using Vectric software since 2006 and find it to be an easy to use in my day to day projects. I am yet to explore the 3D drawing features of Aspire as I have only just upgraded but the 2D functionality is the same as VCarve Pro.


Experiment
Many episodes are created as answers to viewer questions and I thought I would try this to see if others are interested in small videos like this one. I could be opening myself up to an avalanche of drawing questions so I will need to see what happens.

In the meantime I hope this helps and I'll see you on the next episode.

Cheers
Peter