
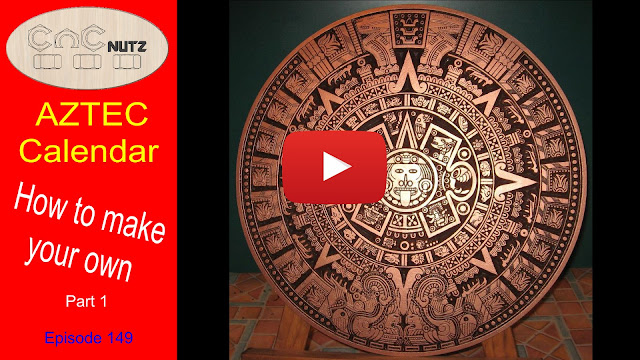
It almost seems a right of passage to make an Aztec Calendar and despite the rumor that the world would end back in 2012 when the calendar ran out, the desire to make one hasn't.
How you read and use the calendar is a complete mystery to me and I suspect everyone who has ever made one other than the creater of the original.
We don't need a fancy Calendar in this day and age to tell us when to plant and harvert our crops, make sacrifices to our various gods and how much longer it is until Christmas as we now have our smart phones to tells us all this and more. But you have to admit, it is cool to have an Aztec calendar on the wall.
This particular one is almost 2 foot in diameter (600mm).

I'm breaking this build down into several parts outlining each step of the process.
This will make it easier to follow for those who want to make their own
Cutter Angle!
One of the main things you need to get right when VCarving is cutter angle.
If the andle specified for the Vbit is not correct your Vcarving won't look right and it only takes a small deviation in angle to make a noticible difference. To this end it is important to test the actual angle of any new cutter you get as opposed to believing what the manufacturer says it is. Spending a few minutes here will save you many hours of wasted time and material. You only need to do this once so it is well worth doing just to be sure.
To see how to Test your cutters please click on the link below.
This will take you the a video explaining in detail the process and you can download files for cutter 90, 60 and 45 degrees in various formats.
http://www.cncnutz.com/2017/06/test-your-v-bit-angle-episode-151.html
If you are looking for the Calendar files please click on the links below

Aztec Calendar file in Vcarve Format
Aztec Calendar file in DXF format
In the next episode I will show how to paint the calendar.
I hope you enjoy and until next time.
Cheers
Peter
Thanks for the V-cutter tips and files. Cheers.
ReplyDeleteNo problem Steve.
DeletePeter, Love the post and this calendar. How do I convert the file to inches? Maybe it would be a good youtube, I think I'm not the only US guy to wonder how this is done for my V-Carve Pro and Mach3 software.
ReplyDeleteI actually figured this out very easily. It was 1 click in V-Carve material setup to convert. Thanks again for the file, I've wanted to do this one for awhile.
DeleteThanks for ALL the vids and how tos, and files!
ReplyDeleteThanks Abel
DeleteHey Peter, Thanks for the file, I have been looking for one of these for a while, now I have to find the time to carve them.
ReplyDeleteNo problem Atts.
DeleteCan't hlp you with the time though.
Cheers
Peter
Thank you for posting these files and the v-bit files. Going to run them straight away as I only have 1 ea of 60 & 90. Much thanks for the vcarve file too. Maybe this time I can pass the right of passage on the Mayan Calendar.
ReplyDeleteThanks Jim.
DeleteI'm sure you will pass no problem.
Cheers
Peter
thanks for the file and tips.
ReplyDeleteNo Problem Eddie.
DeleteThanks for watching.
Keep up the great work peter. Your youtube channel is one of my favorites, I have learned alot. Im making the z height sensor this week ill send a pic when completed.
ReplyDeleteThanks, I look forward to seing it.
DeleteThanks Peter
ReplyDeletePeter, I'm a long time follower. Thanks for the files they will come in handy. As always, love your vids, never seen one I did not like or learn something from. I have been using your stile of clams from my very first cut. Can't wait for the next one.
ReplyDeleteThanks Bluerose, I really appreciate your comments.
DeleteCheers
Peter
Hi Peter
ReplyDeleteBeen follow your youtube channel for a long time keep up the good work.
How did you create the vbit test files as I have a Carbatec Router Bit - 1/4" Laser Point Bit - 45deg which I woult like to check. Below is the link to the V bit cutter from Carbatec in Australia.
https://www.carbatec.com.au/routing-and-shaping/router-bits-individual-and-set/v-groove-bits/laser-point-45deg-12-7d-1-4
Regards
Paul
Hi Paul,
DeleteWill be doing my next video on this very subject and will be including a VCarve file for a 45 degree cutter for those who want it. You will be able to modify it to suit your cutter.
Cheers
Peter
What would you set the depth at say for the 90 and or the 60 degree, was it a 1/8 inch or 1/4?
ReplyDeleteThanks
Chris
I made mine 7mm deep so that would be about 5/16th.
DeleteIS that the flat depth? What would the cut depth be with a 60 degree bit? Apologies if those are stupid questions. I'm still quite new to the world of CNC routers.
DeleteHi Richard,
DeleteI made my flat depth 7mm but for a 90 degree cutter i could have left it without one and it would have been just as good. A flat depth is set to stop the Vbit going any deeper and potentially cutting through the material. Also if you set a flat depth you can specify a different cutter to remove the excess material at the bottom depth which is more effieient. I created a file with a 60 degree cutte and found it goes to a depth of 16.5mm. If I was using 18mm MDF I wouldn't need to se a flat depth but if i was using 12mm I would need to set a depth less than 12mm to ensure it didn't break through. The 7mm was a hang over from my original Aztec Calendar which I curved and the outside edges were ony 7mm thick so I made sure it didn't go deeper. I could have done without the flat depth on the one in the video.
Hope this makes sense.
Cheers
Peter
Hi Peter, thanks for the reply. It's very easy to understand. Im dying to make one of these. What would I set the cut depth to in Aspire for a 60 degree v bit? I tried one already but it went a bit pearshaped. Wee bits were breaking off. I suppose its part of the learning curve. I've now bought some sanding sealet and applied three coats to my MSG as I've read that toughens it up. All advice would be greatly appreciated.
ReplyDeleteRichard
Bah, auto correct. MDF not MSG!
DeleteThe Aztecs were not as sophisticated as their contemporaries in all areas of science and technology but they were very advanced in areas that they needed to be and did very well with what little they had and what the obstacles that they had to face. aztec traditions
ReplyDeleteHello sir, just discovered your channel and love it. would like to know how did you get the nice detailed aztec vector or is this something you did?
ReplyDeletePositive site, where did u come up with the information on this posting?I have read a few of the articles on your website now, and I really like your style. Thanks a million and please keep up the effective work. July Calendar Printable
ReplyDeleteThanks Genious Person. Glad you like the site. The info is just a collection of my personal experiences, things I have read and seen others do in various forums, and of course YouTube. Some things I figure out with myself though Im sure I am not the first to have come up with the ideas. The whole lot is then wrapped up and presented in video form.
DeleteCheers
Peter
Hi Peter, you mentioned here in a post and also in the live session with Dave Gatton, that you domed MDF to get a thinner edge. Did you simply dome the rear side after finishing the front or did you dome the front and do Vcarving by projecting toolpath on 3D?
ReplyDeleteThanks from Berlin
BTW, we get 19 mm black MDF (through and through black coloured), so I'll try the carving on that.
DeleteHi Pradeep
DeleteI doomed the front of the 18mm MDF leaving 18mm at the centre and moving to 6mm on the eges. I then VCarved into ther new surface after sealing it with Shellac to harden it. I used a program called warpdrive to create the dome and then to distort the VCarve Gcode to match the front curve. I haven't seen colored MDF here but it is possible that someone imports it into the country. It will save on the final painting for sure.
Cheers
Peter
Thanks for the insight into the doming process Peter. I'll dome and paint with "old copper" metallic paint so might not need to harden it with shellac. I'll try and get back with results when I do. Thanks for the tip about Warpdrive, shall certainly look into it. I was thinking of creating an STL file for the dome shape but projecting toolpath distorts the carving just a tiny bit, so Warpdrive might be the better option.
DeleteI just entered "Black MDF New Zealand" in my favourite search engine and came up with a couple of interesting links (Just in case you are thinking of going for it).
Thanks for all the information you provide in your videos Peter, and if you ever turn up in Berlin, Germany, I'll be glad to say thanks personally. The nearest I have been to NZ was Sydney.
Pradeep
Hi Peter,
ReplyDeleteMaking a dome of MDF first must have taken a long time! Mind sharing the tools and methods used and the time required?
This comment has been removed by the author.
ReplyDeleteHey Peter,
ReplyDeleteThanks for the sharing your technique in pure CNCnutz style!
Steven
Hi Peter, I'm having sort of a problem with this particular file, if I simply open your vetric file, it works well, but if I open de DXF file instead and calculate the carving, it works but in the opposite way, like a mirrored way of yours, what I mean is, everywhere on yours that is a deep becomes a high on mine, and vice versa, can you teach me how to change this?
ReplyDeletetahnks!
Hi Herbert,
DeleteWhen you select the DXF lines to Vcarve select everything and then deselect the outside ring. That is what is causing the inversion.
Cheers Peter
Oh I see! Thanks for replying :D!
DeleteThank you very much for the explanations and the file, you are a good person !!!
ReplyDelete