
Not all Vbits are created equal and sometimes the angle you buy is not the angle you get. remember that a lot of these router bits are not precision bits and are designed to be used on handheld router sot cut grooves and bevel edges on projects. Their angle is nominal and if used for their intended purpose are more than adequate.
Along comes VCarving and the story is different. A difference of 1 or 2 degrees will have an effect on your Vcarved project and range from, things will not look right to, good greif that looks hideous. The bigger the angle error the worse the final project will look.
Worse than this you start looking for the culprit and think of everything from lost steps to calibration errors and before you know it the machine is in pieces and you arelooking for a red herring.
The answer is simple. Test your cutters and make sure the angle is right before using them the first time. You only need to do this once for each cutter as its angle won't change throughout its working life. A bit of scrap MDF and in no time flat you will know how good that Vbit you bought really is.
Thanks
A big thanks to Paul Z who 10 years ago posted in the Vectric forum and shared a technique for testing Vbit angles. It was seen and remembered by a CNCNut who was new to the hobby and was learning the black art of VCarving.
The original thread can be seen here.
http://forum.vectric.com/viewtopic.php?f=3&t=2164
The concept
The concept that this works on is very simple and clever.
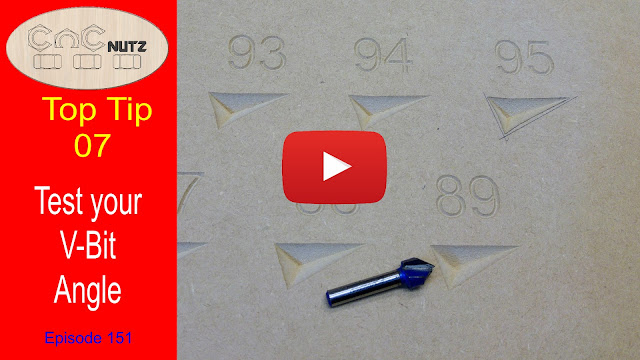
We make a file that contains a multitude of cuts and each has a different angled cutter defined for it. When the angle of the router but matches the angle of the cutter defined in VCarve Pro then the triangle will look right. If the angle is wrong then the sides of the triangle will either bow in or out depending on whether the cutters angle is larger or smaller than the defined angle.
In the example below the angle of the cutter is 90 degrees and so the sides of the 85 degree triangle bows out.

And using the same router bit the 95 degree triangles sides clearly bow in.

Choose the tringle that looks correct and ou will know your cutter angle.
Test Files
I have provided files to cover 3 common cutter angles.
90, 60 & 45 degrees
Please note that that the 90 and 60 degree Vcarve files are configured for a 1/2" (12.7mm) cutter while the 45 degree file I have defined a 1/4" (6.35mm) cutter.
Download here
Cheers
Peter
Thank you for the great videos and advice!
ReplyDeleteThanks, Glad it helps
DeleteCheers
Peter
I can't get the DXF files to open. I'm trying to get the files converted to SVG (which I can use universally), because everything I'm trying to open these with tell me to convert them to AutoCAD 13 or later. Any way you could get these into SVG Pete? Thanks!!!
ReplyDeleteI have converted the DXF files to SVG for you and you will find them in with the rest of the downloads. I am a bit concerved that if your software won't open a DXF file will it be able to create VCarve files? All the best
DeleteCheers
Peter
Thanks for the files Peter - this is a great help, mate !! Cheers, Craig
ReplyDeleteThanks for the files and the help on utube ......
ReplyDeleteOutstanding !!!! Thank you !!! Helped me resolve a problem i have been chasing for a while.
ReplyDeleteGlad it helps.
DeleteCheers
Peter
How would you create a cut file for 30 deg 0.125 dia.
ReplyDelete?
In the same way you would create ant VCarve file with a 1/8" 30 degree cutter.
ReplyDeleteYou would not cut the entire depth at one time but that is set be depth per pass.
You can also limit the depth of cut as it the top of the cut that shows the curved effect.
You could consider scaling the drawing to make it smaller but it might make it harder to see the error.
Make your cutter angle range 25 to 35 degrees so that you cover 5 degrees either side as shown in the example.